
Guest Designer Yuki and Fundamental Frames
Thursday, February 10, 2011
Welcome blog peeps! I'm so excited to show you some ideas for using Fundamental Frames (T-3361) to create some super duper kewl cards and projects.
My first card is super quick and easy--I let the gorgeous TAC Angelee paper (V-843) do all the work. In this first bit of inspiration, I'm basically using one of the Fundamental Frames in a very traditional way--as a frame for my sentiment. The sentiment is from the Tag Tidbits set (T-1186); one of THE best sets for the "insides" of the Fundamental Frames--the words are small enough to fit but BIG on message. (Like the paper lace border? Found it on clearance!)

Here's a closer look at the frame. Notice the edge? I went around the edge with the Stardust Clear Gel Pen. I really love how blingie it looks with very little effort.
Here's how I made this super-cute frame look dimensional.

I stamped the label on cream cardstock, trimmed, then wrinkled the heck out of it.

I then rubbed VersaMagic Jumbo Java (one of my favorites) over the wrinkled label to "antique" it.
And, just like that, the frame becomes just as gorgeous as the background paper.
Ready for more? Take a look at this next card.

Notice the frames?
Here's how I did it.

On glossy cardstock, stamp frame with Palette Iris pad, then wipe with a paper towel. Yepper, you read that correctly. Wipe it dry.

Now, stamp the smaller frame inside the larger frame, using Palette Toile Pink, and wipe entire surface with paper towel.

Stamp bold flower from Happily Grateful (T-3277), using Toile Pink--yep, you guessed it--wipe.

This is how it looks wiped dry--see the difference? The flowers are less "in your face"!

Clean off your bold flower stamp. Now stamp the flower, using the Iris pad, on top of the pink flowers and wipe.
That's how I created the background.

Here's the finished card. An Easter card with no bunnies, chicks, or ducks --just frames and flowers in spring-like Easter colors! The sentiment is from Thinking of You (T-3128) -- a GREAT set -- with messages for just about any occasion--just like this card. Change the colors--change the occasion!
Ready for my third card?

Different huh? I used one of the Fundamental Frames to make a frame!
Here's how I did it.

I first marked my acrylic block so it would be easier to maintain a consistent width while creating the frame.

I started about 1/2" from the top on the right side of a piece of 4 x 5 1/4 white cardstock. I stamped three partial frames on the right side and two on the bottom.

Continuing around, I stamped another three partial frames and two at the top which completes the frame around the cardstock.

Here, I used a circle punch (the yellow one) and punched out all the half moons!

I used a sentiment from another one of my favorite sets, Swooping Sentiments (T-3365). Love this set because the words are so BIG. I like BIG--that's why I live in Texas!!!!!!
And, of course, I had to bling the centers of the flowers with RED Stickles because everything is just a little bit better with Stickles on it--especially RED.
So far so good, right?
Now, let's do something adventurous with the Fundamental Frames! Follow along as I show you how to use these frames to make something totally different -- like a Zentangle tile gift box!

Well, what do you think? Interesting yes?

Here's the inside of the box. I made this box using TAC More Mimi paper (V-855) -- LOVE that paper. It's so pretty, so girlie, and it's doubled-sided--yeehaw!
Here's how I decorated my box lid.
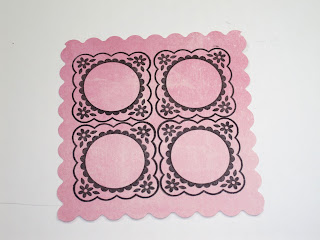
Stamp frame four times on a piece of some pinkielious pink More Mimi paper. Trim around the frames with scalloped scissors.
The more space you leave between each frame, the bigger your box lid.

I formed the sides of the box lid by folding each side down approximately 1/4" or so. You can trim the corners (from the inside of the box) so the corners will be "flatter."


So, this is where we "kick it up a notch" and get CRAZY! With a pencil, mark your circles as I've shown. To make it easier for you to decide WHERE, look at a circle of black scallops, now pick two scallops--one on the left side and one on the right side--draw a curved line connecting them both! Do it again within that same circle.

Once you've marked your two lines on each of the circles, just start making some horizontal lines.
What I love about Zentangles is that you don't really have to be able to draw because I CANNOT draw to save my life but I can do Zentangles.

Now just make some vertical lines.

More vertical lines.

Next just make some circles and fill in that area.

Now take your clear Stardust Gel Pen and make some vertical and horizontal lines in the last open area of the circle.

For this next step, I used a black .005 Micron pen and went over my pencil lines. I also drew random little dots in the area with circles. I didn't put any black on top of the stardust gel pen area.

After all the circles were completed, I then drizzled some Crystal Lacquer and used a soft brush to spread it evenly.

I did sprinkle some Prisma Glitter while the Crystal Lacquer was still wet to just give my box lid some extra sparkle.

This was my first attempt--a plain black and white box with no scalloped edge.


Of course, you can always stamp inside the circles but I wanted to show you how easy it is to add some Zentangling to your stamped art work--something you may not have thought to do! Any empty "space" within a stamp is fair game. Think of all the girls wearing plain dresses in our catalog! Oh my goodness, perfect for Zentangling!

Okay, going back to this box, let me show you how I made the flower.

These are the pieces I started with. I used TAC flower punches (both sizes) with white cardstock and the 1" circle punch with paper from More Mini.
Stamp just a part of a frame on each piece and curl petals using a bone folder.

Here's the finished flower again. I used pop dots between each layer, then added a clear rhinestone on top.

More flowers I made.

Different colors of paper, different parts of frames.


I think this one is so cute!
For my last little bit of inspiration, let's explore something else we can make with these fabulous Fundamental Frames, shall we?
What about FRAMES for photos???? Using frames to make frames--love it.

The size of my photos were 4 x 6 so I took two sheets of paper that size--one black and one soft green. I picked the Fundamental Frame EDGE I wanted to use. Then on the black cardstock, I stamped around the edge of the paper with white ink. On the green piece, I stamped around the edge with black ink. I then used an X-acto knife and cut out the inside, put some glue on the back and glued it to my photo. Viola--a framed photo quick and easy. You can stick a magnet on the back or stick it in a scrapbook.
Well, there you have it--Fundamental Frames (T-3361) -- there are seven fabulous frames in the set and the possibilities are endless!

If you go to my blog, you'll find step-by-step instructions for the origami box. http://redhotstamping.blogspot.com
As always, get out there and


21 comments
SO creative!!! Beautiful artwork, Yuki! Love the little details~ like the gel pen on the edge of the frame!
ReplyDeleteWOW Yuki!!! These are amazing! Great job ... and I think you win for most pictures posted now! :) FAB job!
ReplyDeleteYuki! Just love all the different techniques and ideas - WOW. So many creative ways to use frames and really see them in a different way. Totally amazing!
ReplyDeleteWowser Yuki! You were thinking outside of the "frame" for this...what an incredible variety. Thanks for getting me thinking!! Great job today.
ReplyDeleteThese are wonderful! I love how you used them in different ways... I only saw them as frames, not borders and backrounds! Awesome!
ReplyDeleteOh my goodness! Yuki! You have blown me away with your creativity. I would never have thought of doing whole backgrounds, edges, flowers, all kinds of things with those frames. I have that set and must confess I have not used it. TODAY I will pull it out and see if I can make something and join the blog hop! You're FABULOUS! Love it all!
ReplyDeleteYuki,
ReplyDeleteYou are so unbelievably creative!
So many unique creations!
Thanks for all the "how to" details.
Excellent job Yuki. You are so stinkin creative. What wonderful projects!
ReplyDeleteLove all your fabulous ideas, so inspiring!! Wow!!
ReplyDeletewow - what incredible inspiration - and amazing creativity. I have had this set - and had trouble lining them up with the Nesties - so I didn't know how else to use them.
ReplyDeleteTHANKS for participating - and for the GREAT ideas!
great ideas and really makes me look at the set a different way. Love the frame with the swooping sentiments!
ReplyDeleteAbsolutely AMAZING Yuki! I'm so blown away by all that you saw in these images! I can't wait to make those flowers! LOVE them! TY for breaking down the steps ... now I feel like I can successfully make them!
ReplyDeleteGreat projects, Yuki... fabulous way to think outside the frame :)
ReplyDeleteOh Yuki- Love your creations with this set!!! I'm especially in LOVE with that FUNKY box...so fun and Funkadilious!!! Love it!
ReplyDeleteKerry
Wowzers Yuki....This is Awesome! Fantastic job...you are an Amazing Designer!!!
ReplyDeleteYuki your one Fabulous Diva! LOVE, love, love all of them!! I hope to play with this set tomorrow. ;o)
ReplyDeletei love it! so much more fun to see in person! good job!!!!
ReplyDeleteOMG Yuki!!! These are absolutely amazing!!!
ReplyDeleteOMG - these are sooooo kewl!!! I just have to start thinking 'outside of the box' and try your ideas. THANKS for sharing your creativity.
ReplyDeleteLove what you did with the frames. AWEsome! My favorite was the last project, the box. That is so unique. TFS, Yuki.
ReplyDeleteWow!!! Sooo clever... Who knew you could do so much with this set!!!! Luv Luv Luv those flowers and that box!
ReplyDelete